How to install a Crane Compressor properly?
 Language
 Français
 Español
 Árabe
Árabe
 Deutsch
 简体中文
简体中文
 Português
 Русский
 日本語
日本語
 한국어
한국어
 हिंदी
हिंदी
 Prancis
 Türkçe
 Tiếng Việt
 Italiano
 ไทย
ไทย
-
Tel
+86 15275228746
-
WhatsApp/WeChat
8615275228746
Blog
Company intro
10000m 2+ Cover Area QINGDAO TOP RUN INTERNATIONAL TRADE CO., LTD Qingdao Top Run International Trade Co., Ltd. has been a professional and leading supplier of construction machinery spare parts in China for over 15 years. With extensive experience and expertise, we have established strong partnerships with top manufacturers to offer a wide range of genuine and OEM parts for brands such as XCMG, SANY, ZOOMLION, SHANTUI, LIUGONG, and more. 80+ Employees View more Looking for properate products? Contact us
Send Message
How to install a Crane Compressor properly?
Nov 5, 2025
View: 139
Hey there! As a supplier of Crane Compressors, I've seen firsthand how crucial it is to install these machines properly. A correct installation not only ensures the compressor runs smoothly but also extends its lifespan. In this blog, I'll walk you through the steps of installing a Crane Compressor the right way.
Pre - installation Checks
Before you even start unpacking the compressor, there are a few things you need to do. First off, pick a suitable location. The area should be well - ventilated because compressors generate a lot of heat. You don't want the heat to build up, as it can cause damage to the compressor components. Also, make sure the floor is level and strong enough to support the weight of the compressor. Uneven floors can lead to excessive vibration, which is bad news for the machine.
Next, check the compressor unit itself. Inspect it for any visible damage during shipping. Look for dents, scratches, or loose parts. If you find anything suspicious, contact us right away. We'll sort it out for you. And don't forget to check the accessories that come with the compressor. Make sure you have all the necessary parts, like hoses, fittings, and filters.
Gathering Tools and Materials
You'll need a set of tools to get the installation done. A basic toolkit should include wrenches, screwdrivers, pliers, and a torque wrench. The torque wrench is especially important because it helps you tighten bolts to the correct specifications. Using the wrong torque can either cause the bolts to come loose over time or damage the compressor parts.
In addition to tools, you'll also need some materials. This includes lubricants for the moving parts, sealants for the joints, and electrical wiring if you're hooking it up to a power source. Make sure the lubricants and sealants are compatible with the compressor's materials. Using the wrong ones can lead to leaks or other issues.
Unpacking and Assembly
Carefully unpack the compressor and lay out all the parts. Follow the assembly instructions that come with the unit. Usually, the compressor comes in sections that need to be put together. Start by attaching the main body to the base. Use the bolts and washers provided and tighten them using the torque wrench to the specified torque.
Once the main body is attached, it's time to install the accessories. Connect the hoses to the appropriate ports. Make sure the connections are tight and secure. You can use sealants on the threads to prevent leaks. Attach the filters to their designated spots. Filters are important as they keep the air and oil clean, which is essential for the compressor's performance.
Electrical Installation
If your Crane Compressor is electrically powered, this step is crucial. First, make sure you have the right power supply. Check the voltage and amperage requirements of the compressor and make sure your electrical system can handle it. If you're not sure, consult an electrician.
Connect the electrical wiring to the compressor according to the wiring diagram. Use proper insulation on the wires to prevent short - circuits. Make sure all the connections are tight and there are no loose wires. After connecting the wiring, test the electrical system to make sure everything is working correctly.
Piping Installation
Piping is an important part of the compressor installation. The pipes carry the compressed air from the compressor to where it's needed. Start by measuring and cutting the pipes to the right length. Use a pipe cutter for a clean cut. Then, connect the pipes using fittings. Make sure the fittings are the right size and type for your pipes.
When installing the pipes, try to keep them as straight as possible. Avoid sharp bends or kinks, as they can restrict the airflow and reduce the compressor's efficiency. Also, support the pipes properly to prevent them from sagging or vibrating. You can use pipe brackets or hangers for this purpose.
Testing and Commissioning
Once the installation is complete, it's time to test the compressor. Before starting it up, double - check all the connections, both mechanical and electrical. Make sure all the bolts are tightened, the hoses are connected, and the electrical wiring is secure.
Start the compressor and let it run for a few minutes. Listen for any unusual noises, like rattling or grinding. Check for any leaks around the hoses, pipes, or joints. If you notice any problems, stop the compressor immediately and investigate.
After the initial test, check the pressure and temperature gauges. Make sure the pressure is within the normal operating range and the temperature isn't too high. If everything looks good, let the compressor run for a longer period to ensure it's working properly.
Maintenance Tips
Proper maintenance is key to keeping your Crane Compressor in top shape. Regularly check the oil level and change the oil as recommended in the user manual. Clean or replace the filters at the specified intervals. This helps keep the air and oil clean, which is essential for the compressor's performance.
Inspect the belts and pulleys for wear and tear. Replace them if they're damaged. Also, check the hoses and pipes for any signs of leaks or damage. Tighten any loose connections as needed.
Related Spare Parts
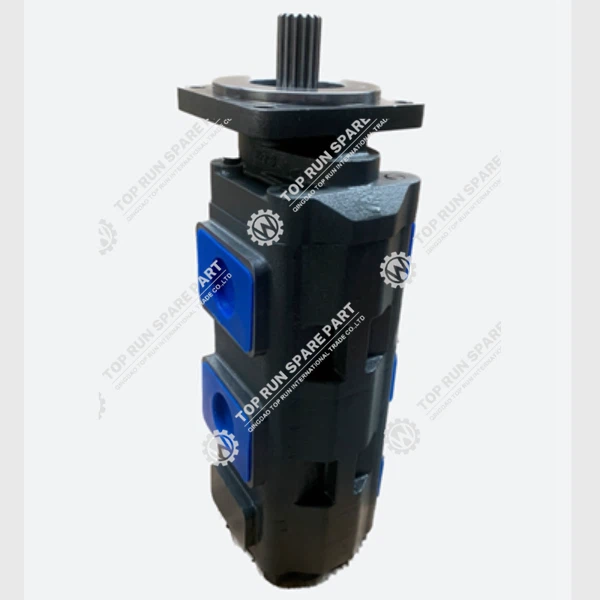
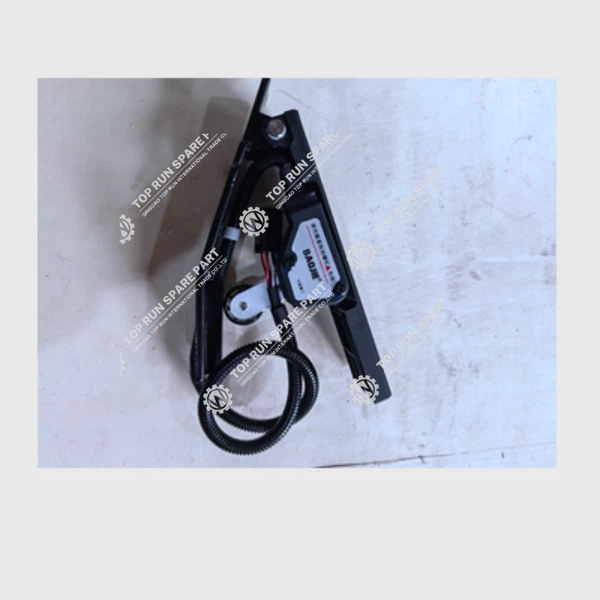
If you ever need spare parts for your Crane Compressor, we've got you covered. We offer a wide range of high - quality spare parts, such as the Accelerator Pedal, Crane Controller, and Hydraulic Gear Pump 60004298. These parts are designed to fit your compressor perfectly and ensure its optimal performance.
Conclusion
Installing a Crane Compressor properly is not a difficult task if you follow the steps carefully. By doing a thorough pre - installation check, using the right tools and materials, and following the assembly and installation instructions, you can ensure your compressor runs smoothly for years to come.
If you have any questions about the installation process or need help with spare parts, don't hesitate to reach out to us. We're here to assist you every step of the way. Whether you're a first - time installer or an experienced pro, we can provide you with the support you need. Contact us for all your Crane Compressor needs and let's start a great business relationship.
References
- Crane Compressor User Manual
- Industry standards for compressor installation
Categories
QR Code


